If you want a good image of your new model that isn't just a screenshot of one of the perspective viewports, you're going to need to render an image.
Basic Scene Setup
-
- Setting up the model
- Load your scene in 3DS max, and isolate everything you want in the render. Hide everything that will not show up, by selecting the items you want visible, then right-clicking anywhere in the viewport, and selecting "Hide Unselected".
- Make your final adjustments to the scene, including fine-tuning item placement, making sure everything looks as it should.
- You may also wish to change the background color of the render, which you can do by hitting "8" on the keyboard, and changing the color from there. The default is black.
- If your model is NOT already textured, apply a dark gray material to it. When in doubt, go slightly darker to be on the safe side, as it will appear lighter in the render after lighting is applied.
- Your model should now be ready for rendering.
-
- Setting up the camera

Viewport navigation
- Setting up the camera
- Select the perspective viewport. Maximize it by clicking the "maximize viewport toggle" button on the bottom right of the window.
- Hit "Shift+F" to turn on your safe frames. They will show you what will and will not be visible in the render. Anything outside the yellow square will not fit in the final rendered frame.
- Navigate the perspective viewport until you have the scene visible exactly from the angle you would like the render to be.
- Place a camera by clicking "Ctrl+C".
- You can fine-tune the camera angle by moving it in the other viewports, or using the "walk through" option, and navigating the camera viewport using the WASD keys to move and the mouse to aim.
-
- Setting up the lighting

The lighting menu
- Setting up the lighting
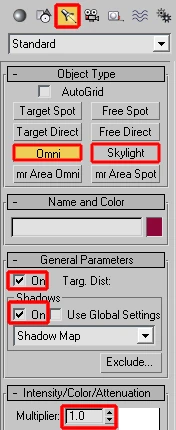
- Switch to the top viewport
- Click on the lighting tab (looks like a flashlight), and place a "Skylight" above the center of your scene. This will be the main light source for the scene.
- Create an "Omni" light, and under the the "Shadows" option select "On", and place it somewhere where it looks good. Usually around a 90ºish angle off the line of sight of your camera. Make sure it is above your scene by at least a short distance.
- If necessary, such as when your scene is too bright, expand the "Intensity/Color/Attenuation" menu, and change the multiplier to something lower than "1.0".
- Your scene should now be properly lit for a render.
Basic Render

The Render Menu (F10)
- Use the F10 key to bring up the render menu. Select the "Common" tab.
- Select, in most cases, either 800x600 under the "output size" section, or input 1024 for width, and 768 for height.
- Select the "Advanced Lighting" tab.
- Under "Select Advanced Lighting", where it says <no lighting plugin>, select "Light Tracer". This will make your renders look more realistic when using the lighting setup shown above.
- Select the viewport with the camera you placed earlier. In the render menu, hit the "Render" button on the bottom right. It may take a few minutes for your image to render.
- To save your image, click the small yellow and gray floppy disk icon on the top left of the render window, name your file, and save as a .jpg or .png, or whatever your preferred file type is.
- You have successfully set up a scene, created and manipulated lighting, set up a camera, and rendered an image!
- To upload the image to Facepunch, or to show your friends, use a free image hosting service like Imageshack.
Wireframe Render
- COMING SOON
Notes
- This is one of those pesky things that just takes practice. If you don't get it right at first, don't get frustrated, just keep trying and it will eventually work.